Medicine-Ball Trunk-Twist Throw: Five Exercise Progressions
Video Coaching Lesson 7 · Philipp Halfmann, M.S. Exercise & Sports Science
Follow all five medicine-ball trunk-twist throw progressions. Watch original video references for Levels I–III, including repeated throws and bounce-pass returns, then learn what changes in Levels IV–V.
Open The Lesson Video Directly
Browse All Video Coaching Lessons · Explore The Second Edition
Lesson Transcript
Explain the five support and movement progressions, with coaching checks and regression choices.
Five Levels, Three Key Changes
This lesson follows the five trunk-twist throw progressions. Levels one to three change the fixed support: two feet, a diagonal lunge, then one leg. Levels four and five add a side-step and a finish on the opposite leg. Across the family, preserve the intended rotational throw, hip-height release and deliberate reset. Choose a level for the task you want to teach. A higher number is not an instruction to advance every athlete.
Level I: Establish The Throw
Level one establishes the throw in two-foot support. Place one foot in each of two shoulder-width rings and begin with slight hip and knee flexion. Hold the ball in both hands, rotate away to load, then initiate through the hips and trunk and release near hip height. Finish in balance within the support area. Before changing the stance, check that the athlete can reproduce the intended release and finish with the selected ball. If the ball changes the action, reduce its mass. The source footage omits the placement rings. Now watch the repeated throws at original speed. After each throw, the partner returns the ball with a bounce pass. That return keeps this filmed exchange going; it differs from the book’s instruction to retrieve the ball after it settles.
Level II: Use A Diagonal Lunge
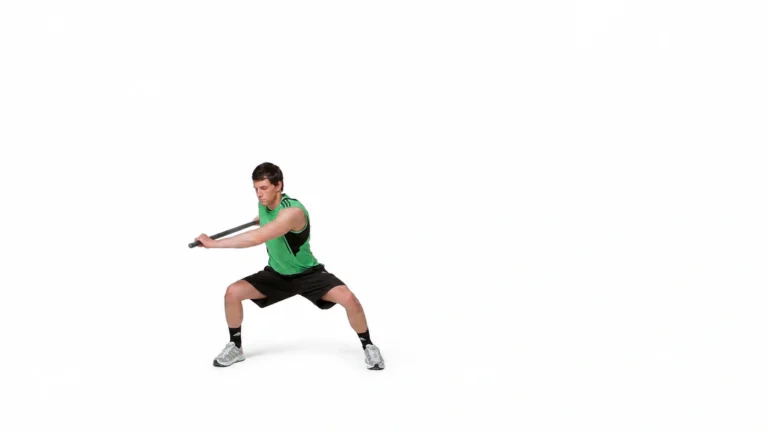
Level two changes the base to a diagonal lunge. The front foot stays flat, with weight directed through its heel. The photographs show the loading position and the release from that stance. Keep the rotational action and hip-height release while controlling the lunge. Work the other lead-leg arrangement as a separate side. Before moving on, observe whether the stance remains deliberate through the throw and finish on each side. If it collapses or the athlete steps out unintentionally, use a lighter ball or return to two-foot support. The goal is the selected support condition, not simply throwing farther. Now watch the original video reference, including the repeated throws and bounce-pass returns.
Level III: Retain One-Leg Support
Level three removes the second foot from support. Establish the diagonal single-leg stance and keep the same supporting leg after release. This is the key difference from the opposite-leg finish introduced later. The photograph is a fixed-support reference, not a complete repetition. Check each supporting leg separately. Before adding travel, look for the intended release and a controlled finish without an unplanned touchdown or hop. If those contacts change, reduce the ball mass or return to the diagonal lunge. A successful throw on one side does not establish control on the other. Now watch the original video reference, including the repeated throws and bounce-pass returns.
Level IV: Step, Lunge, Transfer
Level four adds travel and a leg transfer to the lunge task. In the written leftward example, side-step left into a right-foot diagonal lunge. Throw, bring the free hip forward and finish on the left foot. Retrieve the ball after it settles, then side-step to the other side and reverse the starting-leg arrangement. The lunge photograph identifies the starting support only. It does not show the complete side-step and opposite-foot finish. Check the entry, throw, transfer and reset as distinct parts. If the transition becomes a stumble, return to the fixed lunge and teach the step and recovery separately. Do not add ball mass while introducing this new sequence.
Level V: Step Into Single-Leg Support
Level five keeps the travelling and alternating route, but changes the throwing support from a lunge to one leg. In the leftward example, side-step left and establish right-leg support before throwing. Bring the free left hip forward and transfer onto the left leg. Reset on the other side and reverse the supporting-leg arrangement. Compare that with level three: level three retains the same supporting leg after release; level five transfers to the opposite leg. The photograph shows fixed single-leg support only, not this full sequence. If the entry is uncontrolled, return to the fixed single-leg task. If the leg transfer is the problem, practise the level-four lunge transition before combining the demands.
Progress The Task, Then Reassess
Use the same coaching questions at every level. Did the athlete establish the prescribed support, release toward the intended target, finish deliberately and complete the correct reset? For this family, do not catch a rebound; retrieve the ball after it settles. The original source clips include partner returns, so they are movement references rather than complete demonstrations of that reset. Keep ball mass and repetition conditions consistent when comparing support changes. Reduce the demand that breaks down instead of advancing by number alone. These observations guide coaching choices; they are not a validated readiness score. Assess tennis movement and stroke outcomes separately on court.
Original photography and footage: Philipp Halfmann. White-background stills include background-retouched source frames. Full alternating sequences for Levels IV–V are explained with labelled position references; they are not filmed demonstrations.